 KnowForge
基础
 qianmoQ· 更新于 2026-10-05· 阅读 83 分钟· 0 次阅读
基础
学习如何使用 bRPC 服务器。
示例
Echo 的服务端代码](https://github.com/brpc/brpc/blob/master/example/echo_c++/server.cpp)。
填写 .proto 文件
请求、响应和服务的接口都在 proto 文件中定义。
# Tell protoc to generate base classes for C++ Service. modify to java_generic_services or py_generic_services for java or python.
option cc_generic_services = true;

message EchoRequest {
      required string message = 1;
};
message EchoResponse {
      required string message = 1;
};

service EchoService {
      rpc Echo(EchoRequest) returns (EchoResponse);
};
阅读 protobuf 官方文档以了解有关 protobuf 的更多信息。
实现生成的接口
protoc 会生成 echo.pb.cc 和 echo.pb.h。包含 echo.pb.h 并在其中实现 EchoService:
#include "echo.pb.h"
...
class MyEchoService : public EchoService  {
public:
    void Echo(::google::protobuf::RpcController* cntl_base,
              const ::example::EchoRequest* request,
              ::example::EchoResponse* response,
              ::google::protobuf::Closure* done) {
        // This RAII object calls done->Run() automatically at exit.
        brpc::ClosureGuard done_guard(done);

        brpc::Controller* cntl = static_cast<brpc::Controller*>(cntl_base);

        // fill response
        response->set_message(request->message());
    }
};
服务在插入 brpc.Server 之前不可用。
当客户端发送请求时,Echo() 被调用。
参数说明:
controller
可静态转换为 brpc::Controller(前提是代码运行在 brpc.Server 中)。其中包含请求和响应无法携带的参数,详见 src/brpc/controller.h。
request
来自客户端的只读消息。
response
由用户填充。如果任何 required 字段未设置,RPC 将失败。
done
由 brpc 创建并传递给服务的 CallMethod(),其中包含离开 CallMethod() 之后的所有操作:校验响应、序列化、返回给客户端等。
无论 RPC 成功与否,用户都必须在 RPC 完成时恰好调用一次 done->Run()。
为什么 brpc 不自动调用 done->Run()?因为用户可以将 done 保存到某处,并在离开 CallMethod() 之后的某个事件处理器中再调用 done->Run(),这就是异步服务。
我们强烈建议使用 ClosureGuard 来确保 done->Run() 一定会被调用。看上面代码片段开头的那行语句:
brpc::ClosureGuard done_guard(done);无论回调是从中间退出还是从末尾退出,done_guard 都会被析构,并在其中调用 done->Run()。这种机制被称为 RAII](https://en.wikipedia.org/wiki/Resource_Acquisition_Is_Initialization)。如果没有 done_guard,你就必须记得在每个 return 之前手动添加 done->Run(),这非常容易出错。
在异步服务中,CallMethod() 返回时请求尚未处理完成,因此不应调用 done->Run(),而应将其保存在某处,稍后再调用。乍看之下,这里不需要 ClosureGuard。然而在实际应用中,异步服务也可能中途失败并退出 CallMethod()。如果没有 ClosureGuard,错误分支可能会忘记在 return 之前调用 done->Run()。因此,仍然建议在异步服务中使用 done_guard。与同步服务不同,为了防止在 CallMethod() 成功返回时调用 done->Run(),你需要调用 done_guard.release(),将 done 从该对象中移除。
同步服务与异步服务对 done 的一般处理方式如下:
class MyFooService: public FooService  {
public:
    // Synchronous
    void SyncFoo(::google::protobuf::RpcController* cntl_base,
                 const ::example::EchoRequest* request,
                 ::example::EchoResponse* response,
                 ::google::protobuf::Closure* done) {
         brpc::ClosureGuard done_guard(done);
         ...
    }

    // Aynchronous
    void AsyncFoo(::google::protobuf::RpcController* cntl_base,
                  const ::example::EchoRequest* request,
                  ::example::EchoResponse* response,
                  ::google::protobuf::Closure* done) {
         brpc::ClosureGuard done_guard(done);
         ...
         done_guard.release();
    }
};
ClosureGuard 的接口:
// RAII: Call Run() of the closure on destruction.
class ClosureGuard {
public:
    ClosureGuard();
    // Constructed with a closure which will be Run() inside dtor.
    explicit ClosureGuard(google::protobuf::Closure* done);

    // Call Run() of internal closure if it's not NULL.
    ~ClosureGuard();

    // Call Run() of internal closure if it's not NULL and set it to `done'.
    void reset(google::protobuf::Closure* done);

    // Set internal closure to NULL and return the one before set.
    google::protobuf::Closure* release();
};
将 RPC 设置为失败状态
调用 Controller.SetFailed() 可以将 RPC 设置为失败状态。如果在发送响应时发生错误,框架也会调用该方法。用户通常在服务的 CallMethod() 中调用该方法,例如当某个处理阶段失败时,用户调用 SetFailed() 并调用 done->Run(),然后退出 CallMethod()(如果使用了 ClosureGuard,则会自动调用 done->Run())。服务端的 done 由框架创建,其中包含将响应发送回客户端的代码。如果调用了 SetFailed(),则发送给客户端的是错误信息而非正常内容。当客户端收到响应时,其 controller 同样会被 SetFailed(),并且 Controller::Failed() 将返回 true。此外,Controller::ErrorCode() 和 Controller::ErrorText() 分别返回错误码和错误信息。
对于 http 调用,用户可以在服务端通过调用 controller.http_response().set_status_code() 来设置状态码。标准状态码定义在 http_status_code.h 中。Controller.SetFailed() 同样会设置状态码,其取值为在语义上最接近该错误码的值。如果没有合适的值,则选择 brpc::HTTP_STATUS_INTERNAL_SERVER_ERROR(500)。
获取客户端地址
controller->remote_side() 获取发送该请求的客户端地址,返回类型为 butil::EndPoint。如果客户端是 nginx,则 remote_side() 返回的是 nginx 的地址。要获取 nginx 之前"真实"客户端的地址,需要在 nginx 中设置 proxy_header ClientIp $remote_addr;,并在 RPC 中调用 controller->http_request().GetHeader("ClientIp") 来获取该地址。
打印方法:
LOG(INFO) << "remote_side=" << cntl->remote_side();
printf("remote_side=%s\n", butil::endpoint2str(cntl->remote_side()).c_str());
获取服务器地址
controller->local_side() 获取 RPC 连接的服务端地址,返回类型为 butil::EndPoint。
打印方式:
LOG(INFO) << "local_side=" << cntl->local_side();
printf("local_side=%s\n", butil::endpoint2str(cntl->local_side()).c_str());
异步服务
即在离开服务的 CallMethod() 之后才调用 done->Run()。
有些服务会将请求代理到后端服务器,并等待可能很久之后才会返回的响应。为了更好地利用线程,可以将 done 保存在 CallMethod() 之后触发的相应事件处理器中,并在其内部调用 done->Run()。这类服务称为异步服务。
异步服务的最后一行通常是 done_guard.release(),以防止在 CallMethod() 正常退出时调用 done->Run()。参见示例 example/session_data_and_thread_local。
服务端和客户端都使用 done 来表示离开 CallMethod() 之后的续接代码,但两者完全不同:
- 服务端的 done 由框架创建,由用户在处理完请求后调用,用于将响应发送回客户端。
- 客户端的 done 由用户创建,由框架在 RPC 完成后调用,用于执行用户编写的后处理代码。
在可能访问其他服务的异步服务中,用户往往需要同时操作这两类 done,请务必小心。
添加服务
一个刚完成默认构造的 Server 既不包含服务,也不处理请求,仅仅是一个对象。
使用以下方法添加服务:
int AddService(google::protobuf::Service* service, ServiceOwnership ownership);若 ownership 为 SERVER_OWNS_SERVICE,服务器会在析构时删除该服务。若要防止删除,请将 ownership 设置为 SERVER_DOESNT_OWN_SERVICE。
以下代码添加 MyEchoService:
brpc::Server server;
MyEchoService my_echo_service;
if (server.AddService(&my_echo_service, brpc::SERVER_DOESNT_OWN_SERVICE) != 0) {
    LOG(FATAL) << "Fail to add my_echo_service";
    return -1;
}
服务器启动后,无法再添加或移除服务。
启动服务器
调用 Server 的以下方法开始提供服务。
int Start(const char* ip_and_port_str, const ServerOptions* opt);
int Start(EndPoint ip_and_port, const ServerOptions* opt);
int Start(int port, const ServerOptions* opt);
int Start(const char *ip_str, PortRange port_range, const ServerOptions *opt);  // r32009后增加
“localhost:9000”、“cq01-cos-dev00.cq01:8000”、“127.0.0.1:7000” 都是合法的 ip_and_port_str。
如果 options 为 NULL,所有参数都将取默认值。若需要非默认值,请按如下方式编写代码:
brpc::ServerOptions options;  // with default values
options.xxx = yyy;
...
server.Start(..., &options);
监听多个端口
一个服务器只能监听一个端口(不包括 ServerOptions.internal_port)。若要监听 N 个端口,请启动 N 个服务器。
多进程监听同一端口
启动时开启 reuse_port 标志后,多个进程可以监听同一端口(内部使用 SO_REUSEPORT)。
停止服务器
server.Stop(closewait_ms); // closewait_ms is useless actually, not deleted due to compatibility
server.Join();
Stop() 不会阻塞,而 Join() 会阻塞。将它们分为两个方法的原因是:当多个服务器退出时,用户可以先对所有服务器执行 Stop(),然后再一起 Join()。否则,只能逐个执行 Stop()+Join(),最坏情况下总等待时间会累加为服务器数量的倍数。
无论 closewait_ms 的值如何,服务器都会在退出前等待所有请求处理完成,并立即对新的请求返回 ELOGOFF 错误,以防止它们进入服务。之所以要等待,是因为只要服务器仍在处理请求,就存在访问无效(已释放)内存的风险。如果对某个服务器的 Join() “卡住”,则必然是某个线程阻塞在某个请求上,或者 done->Run() 未被调用。
当客户端收到 ELOGOFF 时,它会跳过相应的服务器,并在其他服务器上重试该请求。因此,默认情况下,使用 brpc 客户端/服务器逐步重启集群不会丢失流量。
RunUntilAskedToQuit() 简化了大多数场景下运行和停止服务器的代码。以下代码会一直运行服务器,直到按下 Ctrl-C。
// Wait until Ctrl-C is pressed, then Stop() and Join() the server.
server.RunUntilAskedToQuit();

// server is stopped, write the code for releasing resources.
服务可以在 Join() 返回后添加或移除,服务器也可以再次 Start()。
通过 http/h2 访问
使用 protobuf 的服务通常可以通过 http/h2+json 访问。存储在 body 中的 json 字符串可以与相应的 protobuf 消息相互转换。
以 echo server 作为示例,可以通过 curl 访问。
# -H 'Content-Type: application/json' is optional
$ curl -d '{"message":"hello"}' http://brpc.baidu.com:8765/EchoService/Echo
{"message":"hello"}
注意:设置 Content-Type: application/proto 以通过 http/h2 + protobuf 序列化数据的方式访问服务,这种方式在序列化上性能更好。
json<=>pb
Json 字段通过名称与消息结构的匹配来对应 pb 字段。json 必须包含 pb 中的必填字段,否则转换将失败,相应的请求会被拒绝。json 可以包含 pb 中未定义的字段,但这些字段会被丢弃,而不会作为未知字段存入 pb 中。转换规则请参阅 json <=> protobuf。
当启用 -pb_enum_as_number 时,pb 中的枚举将转换为数值而非名称。例如在 enum MyEnum { Foo = 1; Bar = 2; }; 中,类型为 MyEnum 的字段在该标志关闭时会被转换为 “Foo” 或 “Bar”,在开启时则转换为 1 或 2。该标志同时影响客户端发送的请求和服务器返回的响应。由于“枚举作为名称”具有更好的前向和后向兼容性,因此只有在需要适配无法从名称解析枚举的遗留代码时,才应开启该标志。
适配旧版客户端
早期版本的 brpc 允许在不填充 pb 请求的情况下通过 http 访问 pb 服务,即使存在必填字段也是如此。这类服务通常自行解析 http 请求并设置 http 响应,不会接触 pb 请求。然而这种行为仍然非常危险:这是一个请求未定义的服务。
这类服务在升级到最新版 brpc 后可能会遇到问题,因为该行为早已被废弃。为了帮助这类服务完成升级,brpc 允许跳过从 http body 到 pb 请求的转换(以便用户可以按自己的方式解析 http 请求),设置方式如下:
brpc::ServiceOptions svc_opt;
svc_opt.ownership = ...;
svc_opt.restful_mappings = ...;
svc_opt.allow_http_body_to_pb = false; // turn off conversion from http/h2 body to pb request
server.AddService(service, svc_opt);
设置该选项后,服务在收到 http/h2 请求时不会将 body 转换为 pb 请求,这也会导致 pb 请求未被定义。当 cntl->request_protocol() == brpc::PROTOCOL_HTTP || cntl->request_protocol() == brpc::PROTOCOL_H2 为 true(表示请求来自 http/h2)时,用户必须自行解析 body。
作为对应,如果 cntl->response_attachment() 不为空且同时设置了 pb response,brpc 将不再报告该歧义,而是使用 cntl->response_attachment() 作为 http/h2 响应的 body。这一行为不受是否设置 allow_http_body_to_pb 的影响。如果这种放宽导致更多用户的错误,我们未来可能会将其重新限制起来。
协议
服务端会自动探测所支持的协议,无需用户指定。cntl->protocol() 可获取当前正在使用的协议。服务端能够在同一个端口上接收不同协议的连接,用户不需要为不同协议指定不同的端口。甚至一条连接也可以传输多种协议的消息,尽管我们很少这样做(也不推荐)。支持的协议:
百度 使用的标准协议,名称为“baidu_std”,默认启用。
流式 RPC,名称为“streaming_rpc”,默认启用。
http/1.0 与 http/1.1,名称为“http”,默认启用。
http/2 与 gRPC,名称为“h2c”(不加密)或“h2”(加密),默认启用。
RTMP 协议,名称为“rtmp”,默认启用。
hulu-pbrpc 协议,名称为“hulu_pbrpc”,默认启用。
sofa-pbrpc 协议,名称为“sofa_pbrpc”,默认启用。
百度广告联盟协议,名称为“nova_pbrpc”,默认禁用。启用方式:
#include <brpc/policy/nova_pbrpc_protocol.h>
...
ServerOptions options;
...
options.nshead_service = new brpc::policy::NovaServiceAdaptor;
public_pbrpc 协议,名称为“public_pbrpc”,默认禁用。启用方式:
#include <brpc/policy/public_pbrpc_protocol.h>
...
ServerOptions options;
...
options.nshead_service = new brpc::policy::PublicPbrpcServiceAdaptor;
nshead+mcpack 协议,名称为“nshead_mcpack”,默认禁用。启用方式:
#include <brpc/policy/nshead_mcpack_protocol.h>
...
ServerOptions options;
...
options.nshead_service = new brpc::policy::NsheadMcpackAdaptor;
顾名思义,该协议的消息由 nshead+mcpack 组成,其中 mcpack 不包含特殊字段。与用户基于 NsheadService 的实现不同,该协议使用 mcpack2pb,使同一份代码既能处理 mcpack 也能处理 pb。由于缺少承载 ErrorText 的字段,出错时服务端只能关闭连接。
阅读实现 NsheadService以了解与 UB 相关的协议。
如果你还需要其他协议,请联系我们。
不带 exec 的 fork
一般而言,fork出的子进程应尽快调用 exec,在此之前只能调用异步信号安全(async-signal-safe)的函数。像这样使用 fork 的 brpc 程序在旧版本中也能正常工作。
但在某些场景下,用户不调用 exec 就继续运行子进程。由于 fork 只会复制调用它的那个线程,其他线程在 fork 后会消失。就 brpc 而言,bvar 依赖一个 sampling_thread 来采样各种信息,该线程在 fork 后消失,导致许多 bvar 变为零。
最新的 brpc 会在 fork(必要时)后重新创建该线程,使 bvar 正常工作,并且可以再次被 fork。一个已知问题是 cpu profiler 在 fork 后不工作。不过用户仍然不能随时调用 fork,因为 brpc 及其应用会大量创建线程,而这些线程在 fork 后不会被重建:
- 大多数 fork 后会继续 exec,重建线程只会被浪费
- 会给代码带来太多麻烦和复杂性
brpc 的策略是按需创建这些线程,因此不带 exec 的 fork 应发生在所有可能创建这些线程的代码之前。具体来说,不带 exec 的 fork 应发生在初始化所有 Server/Channel/Application 之前,越早越好。不遵守这一点的 fork 会导致程序无法正常工作。另外,最好避免不带 exec 的 fork,因为很多库并不支持它。
设置
Version
Server.set_version(…) 为服务器设置 名称+版本,可通过内置服务 /version 访问。虽然名叫“版本”,但建议设置的字符串包含服务名,而不仅仅是一个数字版本。
关闭空闲连接
如果一个连接在 ServerOptions.idle_timeout_sec 指定的秒数内既不读也不写,就会被视为“空闲”,并将很快被服务端关闭。默认值为 -1,即禁用该功能。
如果开启 -log_idle_connection_close,关闭前会打印一条日志。
| 名称 | 值 | 描述 | 定义位置 |
|---|---|---|---|
| log_idle_connection_close | false | 关闭空闲连接时打印日志 | src/brpc/socket.cpp |
pid_file
如果该字段非空,Server 在启动时会创建以此命名的文件,内容为 pid。默认为空。
每行日志打印主机名
该特性只影响 butil/logging.h 中的日志宏。
如果 -log_hostname] 打开,则每一行日志都会包含主机名,这样在聚合日志时,用户就能知道每一行是由哪台机器产生的。
打印 FATAL 日志后崩溃
此功能仅影响 butil/logging.h] 中的日志宏,glog 默认在 FATAL 日志时崩溃。
如果 -crash_on_fatal_log] 打开,则程序在打印 LOG(FATAL) 或 CHECK*() 断言失败后会崩溃,并生成 coredump(需要正确的环境设置)。默认值为 false。可以在测试中打开此标志,以确保程序永远不会遇到严重错误。
一个常见约定:用 ERROR 表示可容忍的错误,用 FATAL 表示不可接受且永久性的错误。
最小日志级别
此功能分别由 butil/logging.h] 和 glog 实现,并使用同名的 gflag。
只有不低于 -minloglevel 所指定级别的日志才会被打印。该标志可在运行时修改。取值与日志级别的对应关系:0=INFO 1=NOTICE 2=WARNING 3=ERROR 4=FATAL,默认值为 0。
未打印日志的开销仅为一次 "if" 判断,参数不会被求值(例如某个参数调用了函数,如果日志不被打印,则该函数不会被调用)。打印到 LogSink 的日志也可以被 sink 过滤。
将空闲内存归还给系统
设置 gflag -free_memory_to_system_interval 可使程序每隔若干秒尝试将空闲内存归还给系统,值 <= 0 则禁用此功能。默认值为 0。要启用它,建议设置值 >= 10。此功能支持 tcmalloc,因此你程序中MallocExtension::instance()->ReleaseFreeMemory()的周期性调用可以通过设置此标志来替代。
向客户端输出错误日志
框架通常不会针对特定客户端打印日志,因为大量由客户端引起的错误可能因频繁打印日志而显著拖慢服务器。如果你需要调试,或者希望服务器记录所有错误,可以打开 -log_error_text]。
自定义延迟百分位
显示的延迟百分位默认为 80(之前是 50)、90、99、99.9、99.99。前 3 个可以通过 gflags -bvar_latency_p1、-bvar_latency_p2、-bvar_latency_p3 分别修改。
以下是正确的设置方式:
-bvar_latency_p3=97   # p3 is changed from default 99 to 97
-bvar_latency_p1=60 -bvar_latency_p2=80 -bvar_latency_p3=95
以下为错误的设置:
-bvar_latency_p3=100   # the value must be inside [1,99] inclusive,otherwise gflags fails to parse
-bvar_latency_p1=-1    # ^
修改栈大小
brpc server 默认在栈大小为 1MB 的 bthread 中运行代码,而 pthread 的栈大小为 10MB。因此,在 pthread 上正常运行的程序,在 bthread 上可能会遇到栈溢出。
设置以下 gflags 可以增大栈大小。
--stack_size_normal=10000000  # sets stacksize to roughly 10MB
--tc_stack_normal=1           # sets number of stacks cached by each worker pthread to prevent reusing from global pool each time, default value is 8
注意:这确实意味着程序的 coredump 很可能是由 bthread 上的"栈溢出"引起的。我们在这里提及它,仅仅是因为这个因素易于快速验证并排除其可能性。
限制消息大小
为了保护服务器和客户端,当服务器接收到的请求或客户端接收到的响应过大时,服务器或客户端会拒绝该消息并关闭连接。该限制由 -max_body_size 控制,单位为字节。
当消息过大被拒绝时,会打印如下错误日志:
FATAL: 05-10 14:40:05: * 0 src/brpc/input_messenger.cpp:89] A message from 127.0.0.1:35217(protocol=baidu_std) is bigger than 67108864 bytes, the connection will be closed. Set max_body_size to allow bigger messagesprotobuf 也有类似的限制](链接地址),错误日志如下:
FATAL: 05-10 13:35:02: * 0 google/protobuf/io/coded_stream.cc:156] A protocol message was rejected because it was too big (more than 67108864 bytes). To increase the limit (or to disable these warnings), see CodedInputStream::SetTotalBytesLimit() in google/protobuf/io/coded_stream.h.brpc 摆脱了 protobuf 的限制,仅通过 -max_body_size 来控制限制:只要该标志足够大,消息就不会被拒绝,也不会打印错误日志。此特性适用于所有版本的 protobuf。
压缩
set_response_compress_type() 设置响应的压缩方式,默认不压缩。
附件不会被压缩。关于 HTTP body 的压缩,请查看这里。
支持的压缩方式:
- brpc::CompressTypeSnappy :snanpy,压缩与解压速度都非常快,但压缩率较低。
- brpc::CompressTypeGzip :gzip,速度明显慢于 snappy,但压缩率更高。
- brpc::CompressTypeZlib :zlib,比 gzip 快 10%~20%,但仍然明显慢于 snappy,压缩率略优于 gzip。
更多对比请阅读 Client-Compression。
附件
baidu_std 和 hulu_pbrpc 支持附件,附件随消息一起发送,由用户设置,用于绕过 protobuf 序列化。从服务器的角度看,设置在 Controller.response_attachment() 中的数据会被客户端接收,而 Controller.request_attachment() 中包含客户端发送过来的附件。
框架不会压缩附件。
在 HTTP 中,附件对应于 message body,即需要 post 给客户端的数据存储在 response_attachment() 中。
开启 SSL
开启 SSL 前请先将 openssl 更新到最新版本,因为较旧版本的 openssl 可能存在严重的安全问题,且支持的加密算法较少,这与使用 SSL 的目的相违背。通过设置 ServerOptions.ssl_options 开启 SSL。更多细节请参考 ssl_options.h。
// Certificate structure
struct CertInfo {
    // Certificate in PEM format.
    // Note that CN and alt subjects will be extracted from the certificate,
    // and will be used as hostnames. Requests to this hostname (provided SNI
    // extension supported) will be encrypted using this certifcate.
    // Supported both file path and raw string
    std::string certificate;

    // Private key in PEM format.
    // Supported both file path and raw string based on prefix:
    std::string private_key;

    // Additional hostnames besides those inside the certificate. Wildcards
    // are supported but it can only appear once at the beginning (i.e. *.xxx.com).
    std::vector<std::string> sni_filters;
};

// SSL options at server side
struct ServerSSLOptions {
    // Default certificate which will be loaded into server. Requests
    // without hostname or whose hostname doesn't have a corresponding
    // certificate will use this certificate. MUST be set to enable SSL.
    CertInfo default_cert;

    // Additional certificates which will be loaded into server. These
    // provide extra bindings between hostnames and certificates so that
    // we can choose different certificates according to different hostnames.
    // See `CertInfo' for detail.
    std::vector<CertInfo> certs;

    // When set, requests without hostname or whose hostname can't be found in
    // any of the cerficates above will be dropped. Otherwise, `default_cert'
    // will be used.
    // Default: false
    bool strict_sni;

    // ... Other options
};
要开启 SSL,用户必须提供
default_cert。若需动态选择证书(即根据请求的主机名选择,也称为 SNI](https://en.wikipedia.org/wiki/Server_Name_Indication)),应使用certs来存放这些动态证书。最后,用户可以在服务器运行期间增删这些证书:int AddCertificate(const CertInfo& cert); int RemoveCertificate(const CertInfo& cert); int ResetCertificates(const std::vector<CertInfo>& certs);其他可配置项包括:密码套件(推荐使用
ECDHE-RSA-AES256-GCM-SHA384,它是 Chrome 使用的默认套件,也是最安全的套件之一,缺点是 CPU 开销更大)、会话复用等等。SSL 层工作在协议层之下。因此,开启 SSL 后,所有协议(例如 HTTP)都能提供 SSL 访问。服务器会先解密数据,再将其传递给各个协议。
开启 SSL 后,同一端口仍然可以接受非 SSL 访问。服务器能够自动区分 SSL 请求与非 SSL 请求。可以通过在服务的回调中使用
Controller::is_ssl(),并在其返回 false 时使用SetFailed来实现仅限 SSL 的模式。同时,内置服务 connections 也会显示每个连接的 SSL 信息。
验证客户端身份
服务器需要实现 Authenticator 以启用验证:
class Authenticator {
public:
    // Implement this method to verify credential information `auth_str' from
    // `client_addr'. You can fill credential context (result) into `*out_ctx'
    // and later fetch this pointer from `Controller'.
    // Returns 0 on success, error code otherwise
    virtual int VerifyCredential(const std::string& auth_str,
                                 const base::EndPoint& client_addr,
                                 AuthContext* out_ctx) const = 0;
    };

class AuthContext {
public:
    const std::string& user() const;
    const std::string& group() const;
    const std::string& roles() const;
    const std::string& starter() const;
    bool is_service() const;
};
认证是针对连接的。当服务器收到某个连接的第一个请求时,会尝试解析其中的相关信息(例如 baidu_std 中的 auth 字段、HTTP 中的 Authorization 头),并连同客户端地址一起调用 VerifyCredential。如果该方法返回 0,表示成功,用户可以将验证通过的信息放入 AuthContext,之后通过 controller->auth_context() 访问它,其生命周期由框架管理。否则认证失败,该连接将被关闭,客户端也会随之失败。
后续请求被视为已通过验证,不再进行认证开销。
将实现了 Authenticator 的实例赋值给 ServerOptions.auth 即可启用认证。该实例在服务器的整个生命周期内必须保持有效。
工作 pthread 的数量
由 ServerOptions.num_threads 控制,默认为 CPU 核心数(包含超线程)。
注意:ServerOptions.num_threads 只是一个提示。
不要认为 Server 就一定使用这么多工作线程,因为同一进程中的所有 Server 和 Channel 共享工作 pthread。线程总数取所有 ServerOptions.num_threads 与 bthread_concurrency 的最大值。例如,某程序有 2 个 Server,num_threads 分别为 24 和 36,而 bthread_concurrency 为 16,则工作 pthread 的数量为 max(24, 36, 16) = 36,这与其他通常采用累加方式的 RPC 实现不同。
Channel 没有对应的选项,但用户可以通过设置 gflag -bthread_concurrency 来改变客户端一侧工作 pthread 的数量。
此外,brpc 不会分离「IO」与「处理」线程。brpc 知道如何将 IO 与处理代码组合在一起,以获得更好的并发性和效率。
限制并发
「并发」可能有两层含义:一是连接数,二是同时处理的请求数。这里讨论的是后者。
在传统的同步服务器中,最大并发受限于工作 pthread 的数量。设置工作线程数也就限制了并发。但 brpc 在 bthread 中处理新请求,M 个 bthread 映射到 N 个工作 pthread(通常 M > N),因此同步服务器的并发可能高于工作线程数。另一方面,尽管异步服务器的并发原则上不受工作线程数限制,但有时仍需要通过其他因素加以限制。
brpc 可以在服务器级别和方法级别限制并发。当服务器或某方法同时处理的请求即将超过限制时,服务器会直接向客户端返回 brpc::ELIMIT,而不再调用服务。看到 ELIMIT 的客户端应(尽最大努力)重试其他服务器。该选项可避免服务端请求积压过多,并限制相关资源的消耗。
默认禁用。
为什么达到并发限制时向客户端返回错误,而不是将请求排队?
服务器达到最大并发并不意味着同一集群中的其他服务器也达到了上限。从集群角度看,让客户端尽快感知错误并尝试其他服务器是更好的策略。
为什么不使用 QPS 限流?
QPS 是秒级指标,不擅长抑制突发请求。最大并发与关键资源的可用性密切相关(如"worker"数量、"slot"数量等),因此更适合防止排队过深。
此外,当服务器延迟稳定时,依据利特尔法则(Little's law),限制并发与限制 QPS 的效果相近。但前者实现起来简单得多:只需对表示并发数的计数器做加减运算即可。这也是大多数流控通过限制并发而非 QPS 实现的原因。例如,TCP 的窗口就是一种并发控制。
计算最大并发
max_concurrency = peak_qps * noload_latency(利特尔法则](https://en.wikipedia.org/wiki/Little%27s_law))
peak_qps 是每秒查询数(Queries-Per-Second)的最大值。noload_latency 是在服务器未被压到极限(延迟可接受)时测得的平均延迟。peak_qps 与 noload_latency 可以通过上线前的性能测试测得,两者相乘即可算出 max_concurrency。
限制服务器级并发
设置 ServerOptions.max_con_concurrency,默认值为 0,表示不限制。对内建服务(builtin services)的访问不受该选项限制。
服务器启动后,可调用 Server.ResetMaxConcurrency() 修改其 max_concurrency。
限制方法级并发
server.MaxConcurrencyOf("…") = … 用于设置该方法的 max_concurrency。可选设置:
server.MaxConcurrencyOf("example.EchoService.Echo") = 10;
server.MaxConcurrencyOf("example.EchoService", "Echo") = 10;
server.MaxConcurrencyOf(&service, "Echo") = 10;
这段代码通常放在 AddService 之后、服务器的 Start() 之前。如果设置失败(即方法不存在),服务器将无法启动,并会通知用户修正 MaxConcurrencyOf 上的设置。
当方法级和服务器级的 max_concurrency 同时设置时,框架会先检查服务器级的设置,然后再检查方法级的设置。
注意:没有服务级的 max_concurrency。
AutoConcurrencyLimiter
max_concurrency 可能会随时间变化,而在每次部署前测量并为所有服务设置 max_concurrency 可能非常麻烦且不切实际。
AutoConcurrencyLimiter 通过限制方法的并发数来解决这个问题。要使用该算法,请将该方法的 max_concurrency 设置为 "auto"。
// Set auto concurrency limiter for all methods
brpc::ServerOptions options;
options.method_max_concurrency = "auto";

// Set auto concurrency limiter for specific method
server.MaxConcurrencyOf("example.EchoService.Echo") = "auto";阅读此]以了解更多关于该算法的信息。
pthread 模式
用户代码(客户端已完成、服务端的 CallMethod)默认运行在栈大小为 1MB 的 bthread 中。但其中一些代码无法在 bthread 中运行:
- JNI 代码会检查栈布局,无法在 bthread 中运行。
- 用户代码大量使用 pthread-local 在函数间传递会话级数据。如果存在同步 RPC 调用或可能阻塞 bthread 的函数调用,恢复运行的 bthread 可能落在另一个 pthread 上,而该 pthread 上并没有用户期望拥有的 pthread-local 数据。相比之下,虽然 tcmalloc 也使用 pthread(或 LWP)-local,但其内部代码与 bthread 无关,因此是安全的。
brpc 提供了 pthread 模式来解决这些问题。当开启 -usercode_in_pthread 时,用户代码将运行在 pthread 中。原本会阻塞 bthread 的函数将阻塞 pthread。
注意:开启 -usercode_in_pthread 后,brpc::thread_local_data() 不保证返回有效值。
开启 pthread 模式时的性能问题:
- 由于同步 RPC 会阻塞工作 pthread,服务端通常需要更多的工作线程(ServerOptions.num_threads),调度效率也会略有下降。
- 实际上用户代码仍然运行在特殊的 bthread 中,这些 bthread 使用 pthread 工作线程的栈。这些特殊 bthread 与普通 bthread 的调度方式相同,性能差异可以忽略不计。
- bthread 支持一个独特特性:将 pthread 工作线程让给新创建的 bthread,从而减少一次上下文切换。brpc 客户端利用此特性将一次 RPC 的上下文切换次数从 3 次减少到 2 次。在对性能要求较高的系统中,减少上下文切换可以提升性能。但 pthread 模式无法做到这一点。
- pthread 模式下的线程数量是硬限制。一旦所有线程都被占满,请求将迅速排队,最终大量请求超时。例如:当下游服务器的大量请求超时后,上游服务也可能因大量阻塞等待响应(在超时时间内)的线程而受到严重影响。开启 pthread 模式时,建议设置 ServerOptions.max_concurrency 以保护服务端。相比之下,bthread 模式下的 bthread 数量是软限制,对此类问题的反应更为平缓。
pthread 模式让遗留代码更容易试用 brpc,但我们仍建议使用 bthread-local 重构代码,甚至逐步移除 TLS,以便将来关闭该选项。
安全模式
如果请求来自公网(包括经由 nginx 等代理),你需要注意一些安全问题。
对公网隐藏内建服务
内建服务很有用,但另一方面也包含大量内部信息,不应暴露给公网。有多种方法可以对公网隐藏内建服务:
设置内部端口。将
ServerOptions.internal_port设置为一个只能从内部访问的端口。你可以通过internal_port查看内建服务,而通过公共端口(即传给Server.Start的端口)进行的访问则会看到如下错误:[a27eda84bcdeef529a76f22872b78305] Not allowed to access builtin services, try ServerOptions.internal_port=... instead if you're inside internal networkhttp 代理只代理指定的 URL。nginx 等可以配置如何将不同的 URL 映射到后端服务器。例如,下面的配置会将指向 /MyAPI 的公共流量映射到
/ServiceName/MethodName的target-server。如果从公共端口访问 /status 等内建服务,nginx 会直接拒绝这些请求。
  location /MyAPI {
      ...
      proxy_pass http://<target-server>/ServiceName/MethodName$query_string   # $query_string is a nginx varible, check out http://nginx.org/en/docs/http/ngx_http_core_module.html for more.
      ...
}请勿在公共服务上开启 -enable_dir_service 和 -enable_threads_service。虽然它们便于调试,但会在服务器上暴露过多信息。以下脚本用于检查公共服务是否启用了这些选项:
curl -s -m 1 <HOSTNAME>:<PORT>/flags/enable_dir_service,enable_threads_service | awk '{if($3=="false"){++falsecnt}else if($3=="Value"){isrpc=1}}END{if(isrpc!=1||falsecnt==2){print "SAFE"}else{print "NOT SAFE"}}'完全禁用内置服务
设置 ServerOptions.has_builtin_services = false,即可完全禁用内置服务。
对外可控制的 URL 转义
brpc::WebEscape() 对 URL 进行转义,以防止恶意注入攻击。
不返回内部服务器的地址
考虑返回地址的签名。例如,在设置 ServerOptions.internal_port 之后,服务器返回的错误信息中的地址会被替换为其 MD5 签名。
自定义 /health
/health 默认返回 “OK”。如果需要自定义 /health 的内容:继承 HealthReporter 并实现生成页面的代码(与其他 http 服务的实现方式类似)。将一个实例赋值给 ServerOptions.health_reporter,该实例不被 server 持有,且在 server 的整个生命周期内必须保持有效。用户可以根据应用需求返回更丰富的健康信息。
thread-local 变量
百度内部的服务在搜索时广泛使用线程局部存储(TLS)。其中有些用于缓存常用对象以减少重复创建,有些用于向全局函数隐式传递上下文。应尽量避免后一种用法。这类函数在没有 TLS 的情况下甚至无法运行,测试起来也很困难。brpc 提供了 3 种机制来解决与线程局部存储相关的问题。
session-local
session-local 数据绑定到一次服务端 RPC:从进入服务的 CallMethod 开始,到调用服务端的 done->Run() 结束,无论该服务是同步还是异步。所有 session-local 数据都会被尽可能地重用,并且在服务器停止之前不会被销毁。
设置 ServerOptions.session_local_data_factory 后,调用 Controller.session_local_data() 即可获取 session-local 数据。如果未设置 ServerOptions.session_local_data_factory,Controller.session_local_data() 始终返回 NULL。
如果 ServerOptions.reserved_session_local_data 大于 0,服务器会在开始服务之前预先创建相应数量的数据。
示例
struct MySessionLocalData {
    MySessionLocalData() : x(123) {}
    int x;
};

class EchoServiceImpl : public example::EchoService {
public:
    ...
    void Echo(google::protobuf::RpcController* cntl_base,
              const example::EchoRequest* request,
              example::EchoResponse* response,
              google::protobuf::Closure* done) {
        ...
        brpc::Controller* cntl = static_cast<brpc::Controller*>(cntl_base);

        // Get the session-local data which is created by ServerOptions.session_local_data_factory
        // and reused between different RPC.
        MySessionLocalData* sd = static_cast<MySessionLocalData*>(cntl->session_local_data());
        if (sd == NULL) {
            cntl->SetFailed("Require ServerOptions.session_local_data_factory to be set with a correctly implemented instance");
            return;
        }
        ...
struct ServerOptions {
...
// The factory to create/destroy data attached to each RPC session.
// If this field is NULL, Controller::session_local_data() is always NULL.
// NOT owned by Server and must be valid when Server is running.
// Default: NULL
const DataFactory* session_local_data_factory;
// Prepare so many session-local data before server starts, so that calls
// to Controller::session_local_data() get data directly rather than
// calling session_local_data_factory->Create() at first time. Useful when
// Create() is slow, otherwise the RPC session may be blocked by the
// creation of data and not served within timeout.
// Default: 0
size_t reserved_session_local_data;
};session_local_data_factory 的类型为 DataFactory,你必须在其内部实现 CreateData 和 DestroyData。
注意:CreateData 和 DestroyData 可能会被多个线程同时调用,必须保证线程安全。
class MySessionLocalDataFactory : public brpc::DataFactory {
public:
    void* CreateData() const {
        return new MySessionLocalData;
    }
    void DestroyData(void* d) const {
        delete static_cast<MySessionLocalData*>(d);
    }
};

MySessionLocalDataFactory g_session_local_data_factory;

int main(int argc, char* argv[]) {
    ...

    brpc::Server server;
    brpc::ServerOptions options;
    ...
    options.session_local_data_factory = &g_session_local_data_factory;
    ...
server-thread-local
server-thread-local 与 对服务的 CallMethod 的一次调用 绑定,从进入服务的 CallMethod 开始,到离开该方法为止。所有 server-thread-local 数据都会被尽可能复用,并且在服务器停止之前不会被删除。server-thread-local 是作为一种特殊的 bthread-local 实现的。
设置 ServerOptions.thread_local_data_factory 后,调用 brpc::thread_local_data() 即可获取一个线程局部对象。如果未设置 ServerOptions.thread_local_data_factory,brpc::thread_local_data() 将始终返回 NULL。
如果 ServerOptions.reserved_thread_local_data 大于 0,Server 会在开始服务前创建这么多数据。
与 session-local 的区别
session-local 数据从服务端的 Controller 中获取,而 server-thread-local 可以从服务器创建的线程内直接或间接运行的任何函数中全局获取。
在同步服务中,session-local 与 server-thread-local 非常相似,唯一的区别是前者必须从 Controller 中创建。如果服务是异步的,并且需要在 done->Run() 中访问数据,则只能使用 session-local,因为在离开服务的 CallMethod 之后,server-thread-local 已经失效。
示例
struct MyThreadLocalData {
    MyThreadLocalData() : y(0) {}
    int y;
};

class EchoServiceImpl : public example::EchoService {
public:
    ...
    void Echo(google::protobuf::RpcController* cntl_base,
              const example::EchoRequest* request,
              example::EchoResponse* response,
              google::protobuf::Closure* done) {
        ...
        brpc::Controller* cntl = static_cast<brpc::Controller*>(cntl_base);

        // Get the thread-local data which is created by ServerOptions.thread_local_data_factory
        // and reused between different threads.
        // "tls" is short for "thread local storage".
        MyThreadLocalData* tls = static_cast<MyThreadLocalData*>(brpc::thread_local_data());
        if (tls == NULL) {
            cntl->SetFailed("Require ServerOptions.thread_local_data_factory "
                            "to be set with a correctly implemented instance");
            return;
        }
        ...
struct ServerOptions {
...
// The factory to create/destroy data attached to each searching thread
// in server.
// If this field is NULL, brpc::thread_local_data() is always NULL.
// NOT owned by Server and must be valid when Server is running.
// Default: NULL
const DataFactory* thread_local_data_factory;
// Prepare so many thread-local data before server starts, so that calls
// to brpc::thread_local_data() get data directly rather than calling
// thread_local_data_factory->Create() at first time. Useful when Create()
// is slow, otherwise the RPC session may be blocked by the creation
// of data and not served within timeout.
// Default: 0
size_t reserved_thread_local_data;
};thread_local_data_factory 的类型是 DataFactory](https://github.com/brpc/brpc/blob/master/src/brpc/data_factory.h),你需要在其中实现 CreateData 和 DestroyData。
注意:CreateData 和 DestroyData 可能会被多个线程同时调用,必须保证线程安全。
class MyThreadLocalDataFactory : public brpc::DataFactory {
public:
    void* CreateData() const {
        return new MyThreadLocalData;
    }
    void DestroyData(void* d) const {
        delete static_cast<MyThreadLocalData*>(d);
    }
};

MyThreadLocalDataFactory g_thread_local_data_factory;

int main(int argc, char* argv[]) {
    ...

    brpc::Server server;
    brpc::ServerOptions options;
    ...
    options.thread_local_data_factory  = &g_thread_local_data_factory;
    ...
bthread-local
Session-local 与 server-thread-local 对大多数服务来说已经够用。但在某些情况下,我们需要一种更通用的线程本地存储方案。此时,你可以使用 bthread_key_create、bthread_key_destroy、bthread_getspecific、bthread_setspecific 等接口,它们与 pthread 中的等价接口 类似。
这些函数同时支持 bthread 和 pthread。在 bthread 中调用时,返回的是 bthread 的私有变量;在 pthread 中调用时,返回的是 pthread 的私有变量。注意,这里的"pthread 私有"并不是由 pthread_key_create 创建的,由 pthread_key_create 创建的 pthread-local 无法通过 bthread_getspecific 获取。同样,GCC 的 __thread 和 C++11 的 thread_local 也无法通过 bthread_getspecific 获取。
由于 brpc 为每个请求创建一个 bthread,服务中的 bthread-local 表现得比较特殊:服务创建的 bthread 在退出时不会删除 bthread-local 数据,而是将数据交还给服务中的池子以备后续复用。这样可以避免 bthread-local 随着 bthread 的创建和销毁而频繁地构造和析构。该机制对用户是透明的。
主要接口
// Create a key value identifying a slot in a thread-specific data area.
// Each thread maintains a distinct thread-specific data area.
// `destructor', if non-NULL, is called with the value associated to that key
// when the key is destroyed. `destructor' is not called if the value
// associated is NULL when the key is destroyed.
// Returns 0 on success, error code otherwise.
extern int bthread_key_create(bthread_key_t* key, void (*destructor)(void* data));

// Delete a key previously returned by bthread_key_create().
// It is the responsibility of the application to free the data related to
// the deleted key in any running thread. No destructor is invoked by
// this function. Any destructor that may have been associated with key
// will no longer be called upon thread exit.
// Returns 0 on success, error code otherwise.
extern int bthread_key_delete(bthread_key_t key);

// Store `data' in the thread-specific slot identified by `key'.
// bthread_setspecific() is callable from within destructor. If the application
// does so, destructors will be repeatedly called for at most
// PTHREAD_DESTRUCTOR_ITERATIONS times to clear the slots.
// NOTE: If the thread is not created by brpc server and lifetime is
// very short(doing a little thing and exit), avoid using bthread-local. The
// reason is that bthread-local always allocate keytable on first call to
// bthread_setspecific, the overhead is negligible in long-lived threads,
// but noticeable in shortly-lived threads. Threads in brpc server
// are special since they reuse keytables from a bthread_keytable_pool_t
// in the server.
// Returns 0 on success, error code otherwise.
// If the key is invalid or deleted, return EINVAL.
extern int bthread_setspecific(bthread_key_t key, void* data);

// Return current value of the thread-specific slot identified by `key'.
// If bthread_setspecific() had not been called in the thread, return NULL.
// If the key is invalid or deleted, return NULL.
extern void* bthread_getspecific(bthread_key_t key);
使用方法
创建一个 bthread_key_t,它代表一类 bthread 线程局部变量。
使用 bthread_[get|set]specific 来获取和设置 bthread 线程局部变量。bthread 首次访问某个线程局部变量时会返回 NULL。
在没有任何线程还在使用与该 key 关联的 bthread 线程局部变量之后,删除该 bthread_key_t。如果在使用期间删除了 bthread_key_t,相关的 bthread 线程局部数据将会泄漏。
static void my_data_destructor(void* data) {
    ...
}

bthread_key_t tls_key;

if (bthread_key_create(&tls_key, my_data_destructor) != 0) {
    LOG(ERROR) << "Fail to create tls_key";
    return -1;
}
// in some thread ...
MyThreadLocalData* tls = static_cast<MyThreadLocalData*>(bthread_getspecific(tls_key));
if (tls == NULL) { // First call to bthread_getspecific (and before any bthread_setspecific) returns NULL
tls = new MyThreadLocalData; // Create thread-local data on demand.
CHECK_EQ(0, bthread_setspecific(tls_key, tls)); // set the data so that next time bthread_getspecific in the thread returns the data.
}示例
static void my_thread_local_data_deleter(void* d) {
    delete static_cast<MyThreadLocalData*>(d);
}

class EchoServiceImpl : public example::EchoService {
public:
    EchoServiceImpl() {
        CHECK_EQ(0, bthread_key_create(&_tls2_key, my_thread_local_data_deleter));
    }
    ~EchoServiceImpl() {
        CHECK_EQ(0, bthread_key_delete(_tls2_key));
    };
    ...
private:
    bthread_key_t _tls2_key;
}

class EchoServiceImpl : public example::EchoService {
public:
    ...
    void Echo(google::protobuf::RpcController* cntl_base,
              const example::EchoRequest* request,
              example::EchoResponse* response,
              google::protobuf::Closure* done) {
        ...
        // You can create bthread-local data for your own.
        // The interfaces are similar with pthread equivalence:
        //   pthread_key_create  -> bthread_key_create
        //   pthread_key_delete  -> bthread_key_delete
        //   pthread_getspecific -> bthread_getspecific
        //   pthread_setspecific -> bthread_setspecific
        MyThreadLocalData* tls2 = static_cast<MyThreadLocalData*>(bthread_getspecific(_tls2_key));
        if (tls2 == NULL) {
            tls2 = new MyThreadLocalData;
            CHECK_EQ(0, bthread_setspecific(_tls2_key, tls2));
        }
        ...
常见问题
Q: 无法写入 fd=1865 SocketId=8905@10.208.245.43:54742@8230: Got EOF
A: 客户端很可能使用了池化连接或短连接,在 RPC 超时后关闭了连接。当服务端回写响应时,发现连接已被关闭,于是报出该错误。"Got EOF" 只表示服务端收到了 EOF(远端正常关闭了连接)。如果客户端使用长连接,服务端很少会报出该错误。
Q: fd=9 SocketId=2@10.94.66.55:8000 的远端已关闭
这不是一个错误,而是一条常见的警告日志,表示远端已关闭连接(EOF)。该日志对排查问题可能有所帮助。
默认关闭。将 gflag -log_connection_close 设为 true 可启用它。(支持在运行时修改])
Q: 为什么在服务端设置线程数不起作用
一个进程中的所有 brpc 服务共享工作 pthread。如果创建了多个服务,工作 pthread 的数量通常是它们 ServerOptions.num_threads 中的最大值。
Q: 为什么客户端延迟远大于服务端延迟
服务端的工作 pthread 可能不够用,导致请求被显著延迟。参阅服务端调试以了解快速排查服务端问题的步骤。
Q: 无法打开 /proc/self/io
部分内核不提供该文件。这不影响服务的正确性,但以下 bvar 将不会被更新:
process_io_read_bytes_second
process_io_write_bytes_second
process_io_read_second
process_io_write_second
问:JSON 字符串“[1,2,3]”无法转换为 protobuf 消息
这不是一个有效的 JSON 字符串,它必须是一个用大括号 {} 包裹的 JSON 对象。
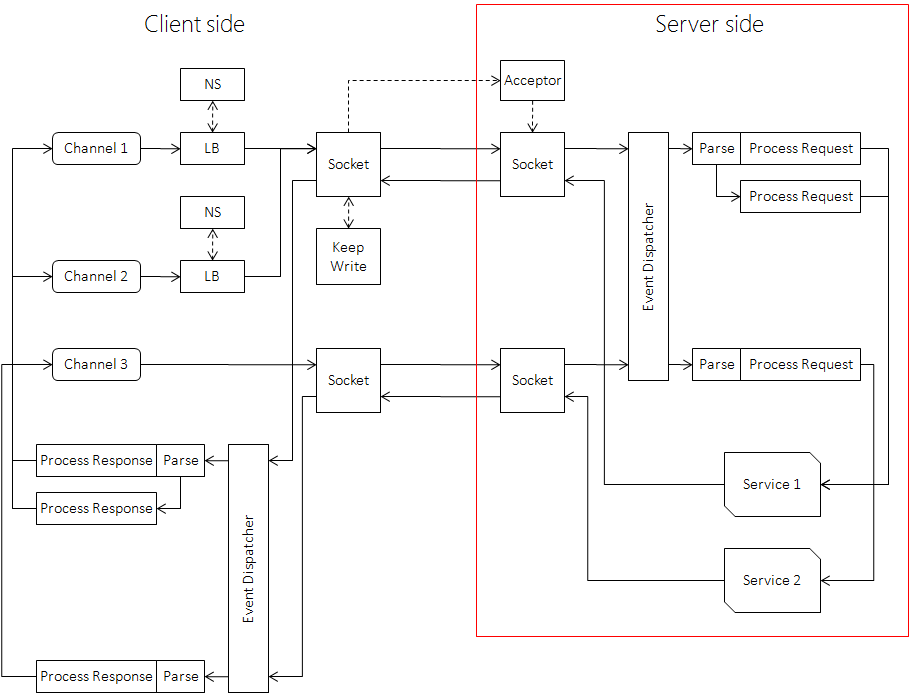
PS:服务端的工作流程
最后修改于 2023 年 1 月 10 日:移除 incubator (devlive-community/knowforge#122) (7647361c1)
评论
登录后参与评论