 KnowForge
Velox 后端微基准测试
 qianmoQ· 更新于 2026-10-02· 阅读 41 分钟· 0 次阅读
本文档介绍如何使用 Gluten Cpp 中已有的微基准测试模板。
Gluten Cpp 提供了针对 Velox 后端的微基准测试,用于模拟 Spark 中第一个阶段(first stage)或中间阶段(middle stage)的执行。与直接在 Spark 作业中调试相比,它为在 Gluten Cpp 中调试提供了一种更便捷的替代方式。开发者可以用它来创建自己的工作负载、在原生进程中进行调试、对热点进行性能分析以及做优化。
要模拟第一个阶段,需要将 Substrait 计划和输入分片信息导出为两个 JSON 文件。分片的输入 URI 必须是已存在的文件位置,可以是本地路径,也可以是 HDFS 路径。
要模拟中间阶段,除了 JSON 文件之外,还需要将该阶段的输入数据保存为 Parquet 文件。基准测试会将数据加载为 Arrow 格式,然后通过 Arrow2Velox 将数据送入 Velox 流水线,以复现 reducer 阶段的执行。Shuffle 交换不包含在内。
请参阅以下章节,了解如何导出 Substrait 计划以及如何创建输入数据文件。
尝试示例
要运行微基准测试,用户需要提供一个包含 JSON 格式 Substrait 计划的文件,以及一个或多个可选的 Parquet 格式输入数据文件。下面的命令用于生成示例输入文件:
cd /path/to/gluten/
./dev/buildbundle-veloxbe.sh --build_tests=ON --build_benchmarks=ON

# Run test to generate input data files. If you are using spark 3.4, replace -Pspark-3.5 with -Pspark-3.4.
mvn test -Pspark-3.5 -Pbackends-velox -pl backends-velox -am \
-DtagsToInclude="org.apache.gluten.tags.GenerateExample" -Dtest=none -DfailIfNoTests=false -Dexec.skip
生成的示例文件位于 gluten/backends-velox 中:
- stageId 指 Spark Web UI 中的 stage id。
- partitionedId 指 Spark Web stage UI 中的 partition id。
- vId 指后端内部的虚拟 id。
$ tree gluten/backends-velox/generated-native-benchmark/
gluten/backends-velox/generated-native-benchmark/
├── conf_12_10_3.ini
├── data_12_10_3_0.parquet
├── data_12_10_3_1.parquet
├── plan_12_10_3.json使用生成的文件作为输入运行微基准测试。你需要指定输入文件的绝对路径:
cd /path/to/gluten/cpp/build/velox/benchmarks
./generic_benchmark \
--plan <path-to-gluten>/backends-velox/generated-native-benchmark/plan_{stageId}_{partitionId}_{vId}.json \
--data <path-to-gluten>/backends-velox/generated-native-benchmark/data_{stageId}_{partitionId}_{vId}_{iteratorIdx}.parquet,\
<path-to-gluten>/backends-velox/generated-native-benchmark/data_{stageId}_{partitionId}_{vId}_{iteratorIdx}.parquet \
--conf <path-to-gluten>/backends-velox/generated-native-benchmark/conf_{stageId}_{partitionId}_{vId}.ini \
--threads 1 --iterations 1 --noprint-result
输出应该是这样的:
2022-11-18T16:49:56+08:00
Running ./generic_benchmark
Run on (192 X 3800 MHz CPU s)
CPU Caches:
  L1 Data 48 KiB (x96)
  L1 Instruction 32 KiB (x96)
  L2 Unified 2048 KiB (x96)
  L3 Unified 99840 KiB (x2)
Load Average: 0.28, 1.17, 1.59
***WARNING*** CPU scaling is enabled, the benchmark real time measurements may be noisy and will incur extra overhead.
-- Project[expressions: (n3_0:BIGINT, ROW["n1_0"]), (n3_1:VARCHAR, ROW["n1_1"])] -> n3_0:BIGINT, n3_1:VARCHAR
   Output: 535 rows (65.81KB, 1 batches), Cpu time: 36.33us, Blocked wall time: 0ns, Peak memory: 1.00MB, Memory allocations: 3, Threads: 1
      queuedWallNanos    sum: 2.00us, count: 2, min: 0ns, max: 2.00us
  -- HashJoin[RIGHT SEMI (FILTER) n0_0=n1_0] -> n1_0:BIGINT, n1_1:VARCHAR
     Output: 535 rows (65.81KB, 1 batches), Cpu time: 191.56us, Blocked wall time: 0ns, Peak memory: 2.00MB, Memory allocations: 8
     HashBuild: Input: 582 rows (16.45KB, 1 batches), Output: 0 rows (0B, 0 batches), Cpu time: 1.84us, Blocked wall time: 0ns, Peak memory: 1.00MB, Memory allocations: 3, Threads: 1
        distinctKey0       sum: 583, count: 1, min: 583, max: 583
        queuedWallNanos    sum: 0ns, count: 1, min: 0ns, max: 0ns
        rangeKey0          sum: 59748, count: 1, min: 59748, max: 59748
     HashProbe: Input: 37897 rows (296.07KB, 1 batches), Output: 535 rows (65.81KB, 1 batches), Cpu time: 189.71us, Blocked wall time: 0ns, Peak memory: 1.00MB, Memory allocations: 5, Threads: 1
        queuedWallNanos    sum: 0ns, count: 1, min: 0ns, max: 0ns
    -- ArrowStream[] -> n0_0:BIGINT
       Input: 0 rows (0B, 0 batches), Output: 37897 rows (296.07KB, 1 batches), Cpu time: 1.29ms, Blocked wall time: 0ns, Peak memory: 0B, Memory allocations: 0, Threads: 1
    -- ArrowStream[] -> n1_0:BIGINT, n1_1:VARCHAR
       Input: 0 rows (0B, 0 batches), Output: 582 rows (16.45KB, 1 batches), Cpu time: 894.22us, Blocked wall time: 0ns, Peak memory: 0B, Memory allocations: 0, Threads: 1

-----------------------------------------------------------------------------------------------------------------------------
Benchmark                                                                   Time             CPU   Iterations UserCounters...
-----------------------------------------------------------------------------------------------------------------------------
InputFromBatchVector/iterations:1/process_time/real_time/threads:1   41304520 ns     23740340 ns            1 collect_batch_time=34.7812M elapsed_time=41.3113M
为任意查询生成 Substrait 计划与输入
首先,使用 --build_benchmarks=ON 构建 Gluten。
cd /path/to/gluten/
./dev/buildbundle-veloxbe.sh --build_benchmarks=ON

# For debugging purpose, rebuild Gluten with build type `Debug`.
./dev/buildbundle-veloxbe.sh --build_benchmarks=ON --build_type=Debug
首先,从 Spark UI 中获取你想要模拟的 Stage Id。然后使用以下配置重新运行查询,将输入数据导出到微基准测试(micro benchmark)。
| 参数 | 描述 | 推荐设置 |
|
|----------------------------------------------|---------------------------------------------------------------------------------------------------------------------------------------------------------------------------------------------------------------------------------------------------------------------------------------------------------------------------------------------|------------------------------------------------------------|
| spark.gluten.sql.benchmark_task.taskId | 以逗号分隔的字符串,用于指定要导出的 Task ID。如果设置了该参数,spark.gluten.sql.benchmark_task.stageId 和 spark.gluten.sql.benchmark_task.partitionId 将被忽略。 | 以逗号分隔的 Task ID 字符串。默认为空。 |
| spark.gluten.sql.benchmark_task.stageId | Spark stage ID。 | 目标 stage ID |
| spark.gluten.sql.benchmark_task.partitionId | 以逗号分隔的字符串,用于指定要导出的 stage 内的 Partition ID。必须与 spark.gluten.sql.benchmark_task.stageId 一起指定。默认为空,表示将导出该 stage 的所有分区。要确定分区 ID,请在 Spark UI 中打开 Stage 标签页,并在 Index 列下查找。 | 以逗号分隔的分区 ID 字符串。默认为空。 |
| spark.gluten.saveDir | 用于保存微基准测试输入数据的目录,该目录必须存在且为空。 | /path/to/saveDir |
检查 spark.gluten.saveDir 中的文件。如果被模拟的 stage 是第一个 stage,你将得到 3 或 4 种类型的导出文件:
- 配置文件:INI 格式,文件名
conf_{stageId}_{partitionId}_{vId}.ini。包含用于初始化 Velox 后端和运行时会话的配置。 - 计划文件:JSON 格式,文件名
plan_{stageId}_{partitionId}_{vId}.json。包含该阶段的 substrait 计划,但不含输入文件的 split。 - Split 文件:JSON 格式,文件名
split_{stageId}_{partitionId}_{vId}_{splitIdx}.json。一个 first stage 任务中可以有多个 split 文件,包含指向输入文件 split 的 substrait 计划片段。 - 数据文件(可选):Parquet 格式,文件名
data_{stageId}_{partitionId}_{vId}_{iteratorIdx}.parquet。如果 first stage 包含一个或多个 BHJ 算子,则可以有一个或多个输入数据文件。first stage 的输入数据文件将作为迭代器加载,用作流水线的输入:
"localFiles": {
  "items": [
    {
      "uriFile": "iterator:0"
    }
  ]
}
运行基准测试。默认情况下,结果会打印到标准输出(stdout)。可以使用 --noprint-result 来屏蔽此输出。
示例命令:
cd /path/to/gluten/cpp/build/velox/benchmarks
./generic_benchmark \
--conf /absolute_path/to/conf_{stageId}_{partitionId}_{vId}.ini \
--plan /absolute_path/to/plan_{stageId}_{partitionId}_{vId}.json \
--split /absolut_path/to/split_{stageId}_{partitionId}_{vId}_{splitIdx}.json,/absolut_path/to/split_{stageId}_{partitionId}_{vId}_{splitIdx}.json \
--threads 1 --noprint-result

# If the stage requires data files, use --data-file to specify the absolute path.
cd /path/to/gluten/cpp/build/velox/benchmarks
./generic_benchmark \
--conf /absolute_path/to/conf_{stageId}_{partitionId}_{vId}.ini \
--plan /absolute_path/to/plan_{stageId}_{partitionId}_{vId}.json \
--split /absolut_path/to/split_{stageId}_{partitionId}_{vId}_{splitIdx}.json,/absolut_path/to/split_{stageId}_{partitionId}_{vId}_{splitIdx}.json \
--data /absolut_path/to/data_{stageId}_{partitionId}_{vId}_{iteratorIdx}.parquet,/absolut_path/to/data_{stageId}_{partitionId}_{vId}_{iteratorIdx}.parquet \
--threads 1 --noprint-result
如果模拟的是中间阶段(即纯 shuffle 阶段),你会得到 3 种转储文件:
- 配置文件:INI 格式,文件名
conf_{stageId}_{partitionId}_{vId}.ini。包含用于初始化 Velox 后端和运行时会话的配置。 - 计划文件:JSON 格式,文件名
plan_{stageId}_{partitionId}_{vId}.json。包含该阶段的 substrait 计划。 - 数据文件:Parquet 格式,文件名
data_{stageId}_{partitionId}_{vId}_{iteratorIdx}.parquet。一个中间阶段任务中可能有多个输入数据文件。中间阶段的输入数据文件会被加载为迭代器,作为流水线的输入:
"localFiles": {
  "items": [
    {
      "uriFile": "iterator:0"
    }
  ]
}
示例命令:
cd /path/to/gluten/cpp/build/velox/benchmarks
./generic_benchmark \
--conf /absolute_path/to/conf_{stageId}_{partitionId}_{vId}.ini \
--plan /absolute_path/to/plan_{stageId}_{partitionId}_{vId}.json \
--data /absolut_path/to/data_{stageId}_{partitionId}_{vId}_{iteratorIdx}.parquet,/absolut_path/to/data_{stageId}_{partitionId}_{vId}_{iteratorIdx}.parquet \
--threads 1 --noprint-result
对于某些复杂查询,stageId 可能无法代表 Substrait 计划的输入,请从 Spark UI 获取 taskId,并从 saveDir 获取目标 parquet 文件。
在本示例中,仅有一个分区输入,其 stage id 为 3,partition id 为 2,partitionId 为 36,迭代器长度为 2。
cd /path/to/gluten/cpp/build/velox/benchmarks
./generic_benchmark \
--plan /absolute_path/to/plan_3_36_0.json \
--data /absolute_path/to/data_3_36_0_0.parquet,/absolute_path/to/data_3_36_0_1.parquet \
--threads 1 --noprint-result
将输出保存为 parquet 以供分析
你可以通过 --save-output <output> 将输出保存为 parquet 文件。
注意:1. 该选项不能与 --with-shuffle 同时使用。2. 该选项不能用于写入任务。更多详情请参阅章节 模拟写入任务。
cd /path/to/gluten/cpp/build/velox/benchmarks
./generic_benchmark \
--plan /absolute_path/to/plan_{stageId}_{partitionId}_{vId}.json \
--data /absolute_path/to/data_{stageId}_{partitionId}_{vId}_{iteratorIdx}.parquet
--threads 1 --noprint-result --save-output /absolute_path/to/result.parquet
添加 shuffle 写入过程
你可以通过 --with-shuffle 在管道末尾添加 shuffle 写入过程。
注意:1. 该选项不能与 --save-output 同时使用。2. 该选项不能用于写入任务,详情请参阅「模拟写入任务](https://apache.github.io/gluten/developers/MicroBenchmarks.html#simulate-write-tasks)」一节。
cd /path/to/gluten/cpp/build/velox/benchmarks
./generic_benchmark \
--plan /absolute_path/to/plan_{stageId}_{partitionId}_{vId}.json \
--split /absolute_path/to/split_{stageId}_{partitionId}_{vId}_{splitIdx}.json \
--threads 1 --noprint-result --with-shuffle
开发者可以利用 --with-shuffle 选项,通过在 Gluten 中创建一条简单的 table scan + shuffle write 管道来对 shuffle-write 过程进行基准测试。具体做法是从第一个 stage 转储微基准测试的输入数据。步骤如下:
- 启动 spark-shell 或 pyspark
我们需要设置 spark.gluten.sql.benchmark_task.stageId 和 spark.gluten.saveDir 来转储输入数据。通常情况下,stage id 应大于 0。你可以先执行第 2 步中的命令,以获取适合你场景的正确 stage id。这里我们将 spark.default.parallelism 设为 1,并将 spark.sql.files.maxPartitionBytes 设得足够大,以确保第一个 stage 中只有 1 个 task。
# Start pyspark
./bin/pyspark --master local[*] \
--conf spark.gluten.sql.benchmark_task.stageId=1 \
--conf spark.gluten.saveDir=/path/to/saveDir \
--conf spark.default.parallelism=1 \
--conf spark.sql.files.maxPartitionBytes=10g
... # omit other spark & gluten config- 运行 table-scan 命令以导出第一个 stage 的执行计划
如果模拟的是单分区或轮询(round-robin)分区方式,第一个 stage 中只能包含表扫描(table scan)算子。
>>> spark.read.format("parquet").load("file:///example.parquet").show()如果模拟哈希分区,则会有一个用于生成哈希分区键的 projection。因此,我们需要显式运行 repartition,以为第一阶段生成 scan + project 管道。注意,在此使用不同的 shuffle 分区数并不会改变所生成的管道。
>>> spark.read.format("parquet").load("file:///example.parquet").repartition(10, "key1", "key2").show()不支持模拟范围分区。
- 使用转储的输入运行微基准测试
Shuffle 写入的通用配置:
--with-shuffle:在 pipeline 末尾添加 shuffle 写入过程--shuffle-writer:指定 shuffle writer 类型。可选值为 sort 和 hash,默认为 hash。--partitioning:指定分区类型。可选值为 rr、hash 和 single,默认为 rr。分区类型应与第 2 步中的命令保持一致。--shuffle-partitions:指定 shuffle 分区数量。--compression:shuffle 输出的压缩编码默认为 lz4。你可以切换为其他压缩编码,或使用硬件加速器。可选值为:lz4、zstd、qat-gzip、qat-zstd 和 iaa-gzip。压缩级别为固定值(使用默认压缩级别 1)。注意:使用 QAT 或 IAA 编码需要 Gluten cpp 已启用并构建这些特性。请先参阅 Velox 文档 中的相应章节,了解如何在 Gluten 中设置、构建并启用这些特性。关于 QAT 支持,请参阅 Intel® QuickAssist Technology (QAT) support。关于 IAA 支持,请参阅 Intel® In-memory Analytics Accelerator (IAA/IAX) support
cd /path/to/gluten/cpp/build/velox/benchmarks
./generic_benchmark \
--plan /path/to/saveDir/plan_{stageId}_{partitionId}_{vId}.json \
--conf /path/to/saveDir/conf_{stageId}_{partitionId}_{vId}.ini \
--split /path/to/saveDir/split_{stageId}_{partitionId}_{vId}_{splitIdx}.json \
--with-shuffle \
--shuffle-writer sort \
--partitioning hash \
--threads 1
仅运行 shuffle 写入/读取任务
开发者可以通过指定 --run-shuffle 和 --data 选项,仅运行 shuffle 写入任务。Parquet 格式的输入将由 arrow-parquet 读取器读取并发送到 shuffle 写入器。--run-shuffle 选项与 --with-shuffle 选项类似,但不需要执行计划和 split 文件。默认使用 round-robin 分区器;此外,也可以出于测试目的使用随机分区。通过指定 --partitioning random 选项,分区器将为每一行生成一个随机分区 ID。为了评估 shuffle 读取器的性能,开发者可以设置 --run-shuffle-read 选项,在写入任务完成后追加读取过程。
下面的命令将以单线程运行 shuffle 写入/读取,使用 sort shuffle 写入器,分区数为 40000,并采用随机分区 ID。
cd /path/to/gluten/cpp/build/velox/benchmarks
./generic_benchmark \
--run-shuffle \
--run-shuffle-read \
--data /path/to/input_for_shuffle_write.parquet
--shuffle-writer sort \
--partitioning random \
--shuffle-partitions 40000 \
--threads 1
输出应如下:
-------------------------------------------------------------------------------------------------------------------------
Benchmark                                                               Time             CPU   Iterations UserCounters...
-------------------------------------------------------------------------------------------------------------------------
ShuffleWriteRead/iterations:1/process_time/real_time/threads:1 121637629714 ns   121309450910 ns            1 elapsed_time=121.638G read_input_time=25.2637G shuffle_compress_time=10.8311G shuffle_decompress_time=4.04055G shuffle_deserialize_time=7.24289G shuffle_spill_time=0 shuffle_split_time=69.9098G shuffle_write_time=2.03274G
启用调试模式
spark.gluten.sql.debug(debug mode) 默认设置为 false,因此 Google glog 的日志级别被限制为只输出 WARNING 或更高级别的日志。除非通过 --conf 在 INI 文件中设置了 spark.gluten.sql.debug,否则日志行为与关闭调试模式时相同。开发者可以在需要时使用 --debug-mode 命令行参数开启调试模式,并通过命令行参数 --v 和 --minloglevel 设置详细程度/严重级别。请注意,构造和销毁日志字符串可能非常耗时,这会导致基准测试的时间不准确。
启用 HDFS 支持
启用运行时动态加载 libhdfs.so 以支持 HDFS 后,如果使用 HDFS 文件运行基准测试,则需要设置 Hadoop 的 classpath。可以通过运行以下命令来完成此操作
export CLASSPATH=`$HADOOP_HOME/bin/hdfs classpath --glob`否则 HDFS 连接将会失败。如果你已经用 libhdfs3.so 替换了 ${HADOOP_HOME}/lib/native/libhdfs.so,则无需设置 CLASSPATH。
模拟写入任务
写入任务的最后一个算子是文件写入算子,Velox 管道的输出仅包含若干列统计数据。因此,指定选项 --with-shuffle 和 --save-output 不会生效。你可以通过 --write-path 选项指定写入器的输出路径,默认值为 /tmp。
cd /path/to/gluten/cpp/build/velox/benchmarks
./generic_benchmark \
--plan /absolute_path/to/plan.json \
--split /absolute_path/to/split.json \
--write-path /absolute_path/<dir>
模拟任务溢写
你可以通过指定内存硬限制--memory_limit来模拟任务溢写。默认情况下,溢写文件会被写入 /tmp 目录。为了模拟真实的 Gluten 工作负载(其会使用多个溢写目录),请将环境变量 GLUTEN_SPARK_LOCAL_DIRS 设置为以逗号分隔的字符串。更多详情请参阅使用多进程和多线程模拟 Gluten 工作负载]。
使用多进程和多线程模拟 Gluten 工作负载
你可以使用以下命令启动多个进程和线程,以模拟 Spark 上的并行执行。同一进程中的每个线程将被绑定到从 --cpu 开始递增的 CPU 核心编号上。
假设运行在一台 48 核、双路、开启超线程的物理机上,执行以下命令将用满所有虚拟核心。
processes=24 # Same value of spark.executor.instances
threads=8 # Same value of spark.executor.cores

for ((i=0; i<${processes}; i++)); do
    ./generic_benchmark --plan /path/to/plan.json --split /path/to/split.json --noprint-result --threads $threads --cpu $((i*threads)) &
done
若要包含 shuffle write 过程或通过 --memory-limit 触发溢写,您可以将 GLUTEN_SPARK_LOCAL_DIRS 环境变量设置为以逗号分隔的字符串,从而指定多个目录。这样可以将 I/O 负载分散到多个磁盘上,其工作方式与 Gluten 负载类似。运行时会在每个指定的目录下创建临时子目录,若进程正常完成,这些子目录将被自动删除。
mkdir -p {/data1,/data2,/data3}/tmp # Make sure each directory has been already created.
export GLUTEN_SPARK_LOCAL_DIRS=/data1/tmp,/data2/tmp,/data3/tmp

processes=24 # Same value of spark.executor.instances
threads=8 # Same value of spark.executor.cores

for ((i=0; i<${processes}; i++)); do
    ./generic_benchmark --plan /path/to/plan.json --split /path/to/split.json --noprint-result --with-shuffle --threads $threads --cpu $((i*threads)) &
done
运行示例
我们还在 cpp/velox/benchmarks/data 中提供了一些示例输入。例如,generic_q5 下的文件模拟了 TPCH Q5 的第一阶段,其中包含大量的表扫描操作。你可以按照以下步骤运行该示例。
1.
用文件编辑器打开 generic_q5/q5_first_stage_0_split.json。搜索 "uriFile": "LINEITEM",并将 LINEITEM 替换为 lineitem 中某个分区文件的 URI。在下一行中,将 "length": "..." 中的数字替换为实际的文件长度。假设你使用的是 cpp/velox/benchmarks/data/tpch_sf10m 中提供的小型 TPCH 表,则替换后的 JSON 应如下所示:
{
  "items": [
    {
      "uriFile": "file:///path/to/gluten/cpp/velox/benchmarks/data/tpch_sf10m/lineitem/part-00000-6c374e0a-7d76-401b-8458-a8e31f8ab704-c000.snappy.parquet",
      "length": "1863237",
      "parquet": {}
    }
  ]
}- 启动多个进程和多个线程。设置
GLUTEN_SPARK_LOCAL_DIRS并在命令中添加--with-shuffle。
mkdir -p {/data1,/data2,/data3}/tmp # Make sure each directory has been already created.
export GLUTEN_SPARK_LOCAL_DIRS=/data1/tmp,/data2/tmp,/data3/tmp

processes=24 # Same value of spark.executor.instances
threads=8 # Same value of spark.executor.cores

for ((i=0; i<${processes}; i++)); do
    ./generic_benchmark --plan /path/to/gluten/cpp/velox/benchmarks/data/generic_q5/q5_first_stage_0.json --split /path/to/gluten/cpp/velox/benchmarks/data/generic_q5/q5_first_stage_0_split.json --noprint-result --with-shuffle --threads $threads --cpu $((i*threads)) &
done >stdout.log 2>stderr.log
你可以在 stdout.log 中找到 elapsed_time 及其他指标。在下面的输出中,elapsed_time 约为 10.75 秒。如果你在 Spark 上使用 Gluten 运行 TPCH Q5,同一 Spark 阶段中的单个任务所耗时间应当大致相同。
------------------------------------------------------------------------------------------------------------------
Benchmark                                                        Time             CPU   Iterations UserCounters...
------------------------------------------------------------------------------------------------------------------
SkipInput/iterations:1/process_time/real_time/threads:8 1317255379 ns   10061941861 ns            8 collect_batch_time=0 elapsed_time=10.7563G shuffle_compress_time=4.19964G shuffle_spill_time=0 shuffle_split_time=0 shuffle_write_time=1.91651G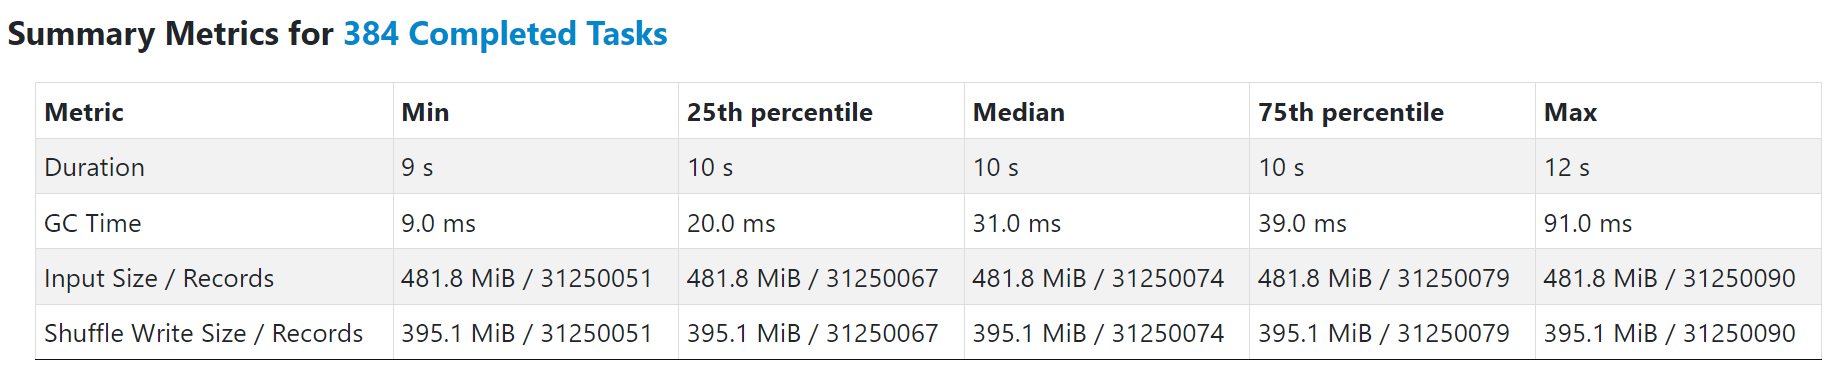
评论
登录后参与评论